Deploy to Radix using other Continuous Integration (CI) tool
There might be several reasons why you would opt against using Radix as a CICD platform, and just using the CD part of Radix
- Your application consists of a set of components (i.e. micro services), with source code hosted in separate repositories
- Your application depends on different resources, and the deployment to Radix needs to be orchestrated
- Your team has more advanced needs of the CI i.e. test reports, git lfs
Configuring the app
Same as with any other application deployed to Radix, a deploy-only application will need:
- A GitHub repository for the code (only GitHub is supported at the moment)
- A
radixconfig.yamlfile that defines the running environments, which by default is in the root directory of the repository - Deploy key for the Radix application.
These points are described below
The repository
Unlike a regular Radix application, for a deploy-only application you have two options on how to structure your repositories. You can choose to have:
- The GitHub repository which act as a pure configuration repository. That is, source code for the different components resides in other repositories
- The
radixconfig.yamlis in the source code repository
The documentation will use the second option.
The radixconfig.yaml file
Radix only reads radixconfig.yaml from the branch we set as the Config Branch in the application configuration form. If the file is changed in other branches, those changes will be ignored.
The major difference between a deploy-only and a regular Radix application, is that the image property in radixconfig.yaml is set for all components and jobs.
When image is suffixed with {imageTagName}, the Radix deploy pipeline will replace {imageTagName} with the environment specific imageTagName from radixconfig.yaml, or from the value specified with the --image-tag-name flag in Radix CLI. If imageTagName is not specified for an environment, it must be set with the --image-tag-name flag. If both are specified, --image-tag-name takes precedence over imageTagName.
apiVersion: radix.equinor.com/v1
kind: RadixApplication
metadata:
  name: my-app
spec:
  environments:
    - name: qa
      build:
        from: master
    - name: prod
      build:
        from: release
  components:
    - name: api
      image: ghcr.io/my-repo/my-app/api:{imageTagName}
      ports:
        - name: http
          port: 3000
      publicPort: http
      environmentConfig:
        - environment: qa
          imageTagName: master-latest
        - environment: prod
          imageTagName: release-39f1a082
  privateImageHubs:
    ghcr.io:
      username: <some GitHub user name>
      email: <some email>
In the radixconfig.yaml above, there are two tagging strategies;
- Using a latest tag (i.e. master-latest)
- Using a dynamic tag (i.e. release-39f1a082)
A dynamic tag in this context means that there is a new tag produced for every build, either referring to the release tag, or the commit sha (in the case above) or any other attributes that uniquely identifies what the image is produced from. The dynamic tag will give better control over what runs in the environment, and it also allows for promoting older deployments in case there is a need for a rollback.
A static tag will not permit radix to update an existing deployment by relying on changes to imageTagName to pull a new image. To force radix to pull a new image from the image-hub, the component must be restarted using the component page on the web-console or restart call to the Radix API or CLI. The URL for Radix API depends on which Radix cluster is hosting the application.
The second part of the radixconfig.yaml which distinguishes itself from a regular radix application is the privateImageHubs property. In short, it will allow for the image produced outside of Radix to be pulled down to the Radix cluster.
Also what can be said about the configuration above is the branch to environment mapping. Since build of components happens outside of Radix the build -> from configuration seems unnecessary. You could, especially if the repository for the Radix application is a mere configuration repository, leave environments unmapped. We will explain later why we, in this example, have opted to have a branch-environment mapping.
The full syntax of radixconfig.yaml is explained in Radix Config reference.
Registering the application
Registering the Radix application follows the pattern of a regular Radix application. The only difference is that we skip adding a web-hook to Radix. We then avoid that the application is built and deployed to Radix, using the Radix CI. The mechanism for deploying to Radix will be described in the next section.
AD Service principal access token
In a deploy-only scenario, Radix will only deploy, rather than build and deploy, when the GitHub webhook notified about changes, occurred in the repository. In order to run a deploy-only pipeline job, Azure service principals (Azure AD app registration or user-assigned managed identity) can be used:
-
Create or use an existing service principal (Azure AD app registrations or user-assigned managed identities)
-
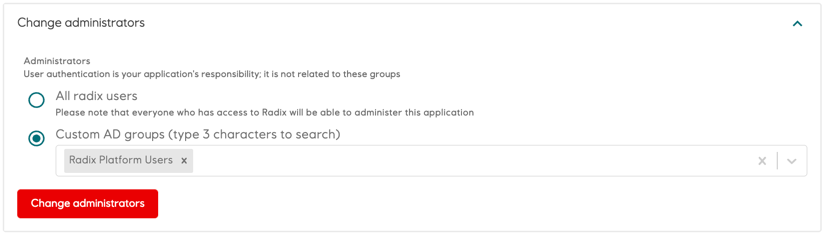
Add this service principal as a member to one of the AAD groups, which is set as an administrator of the Radix application. This group need to be of the type Security with the source Cloud. If the group has wrong type or source, a new AD group can be requested from ServiceNow:
- Open the Services@Equinor portal and find the service "IT access and accounts"
- Select "Identity and access management support", click Next, select "AccessIT: Application role modelling and support (config)"
- In the Description field, add the comment: "This is an Azure AD group, which should be of type Security, it will be maintained manually in the Azure portal and not via ServiceNow"
- Once the group is created, add it as an administrator for the Radix application in the Radix Web Console "Configuration" form
-
Change an external pipeline job (GitHub action, DevOps pipeline, etc.) to login as the service principal with request of an access token, which can be used with Radix CLI or Radix API within such job.
-
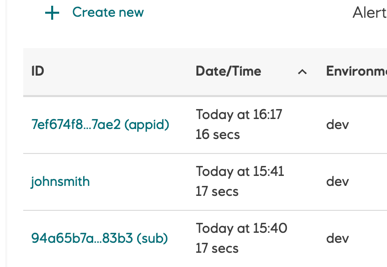
When pipeline job is created by a service principal, it will be visible in the Radix Web Console pipeline job list with this service principal application id with a postfix
(appid), or its object id with a postfix(sub). Full id is shown in a tooltip and in the job details
Note that the access token has one-hour live period, with access to all operations that an application administrator has (i.e. deleting the application, setting secrets). Please make efforts not to have this token fall into the wrong hands.
Read about how to connect GitHub actions and Azure to add federation between them.
Example of use of an access token in a GitHub action
Making calls to Radix
With the access token you can make calls to Radix API through either:
- Calling the Radix API directly by passing the bearer token (i.e. curl -X GET --header "Authorization: Bearer $token")
- Calling the API though functions in the Radix CLI, which allows for simpler access to the API
- Calling the API through Radix GitHub Actions. If you have opted for GitHub Actions as your CI tool, then calling the Radix API indirectly through the Radix CLI using the Radix GitHub Actions can be done. It allows for simpler access to the CLI in your action's workflow.
Example of using GitHub action to create a Radix deploy pipeline job
Updating deployments on static tags
As part of deploying an application to kubernetes, Radix reads the radixconfig.yaml file and based on this creates kubernetes resources. If there are no changes to the radixconfig.yaml file, there will be no changes to the underlying kubernetes resources. As a default kubernetes will then do nothing.
When utilizing static tags, there will often be no changes to radixconfig.yaml when performing a deployment. Kubernetes will then continue to run its existing containers after deployment.
This default behavior can be overwritten in radixconfig.yaml by setting flag alwaysPullImageOnDeploy on component level. When this flag is set to true, a deployment will always lead to a change in the underlying kubernetes resource, which again lead to kubernetes pulling the newest image from the container registry.
spec:
  environments:
  components:
    - name: api
      image: ghcr.io/my-repo/my-app/api:latest
      alwaysPullImageOnDeploy: true
You can also include the reference to the image itself in the imageTagName property, sample:
  components:
    - name: app
      image: {imageTagName}
      environmentConfig:
        - environment: qa
          imageTagName: docker.pkg.github.com/equinor/myapp/backend:qa
        - environment: dev
          imageTagName: docker.pkg.github.com/equinor/myapp/backend:dev
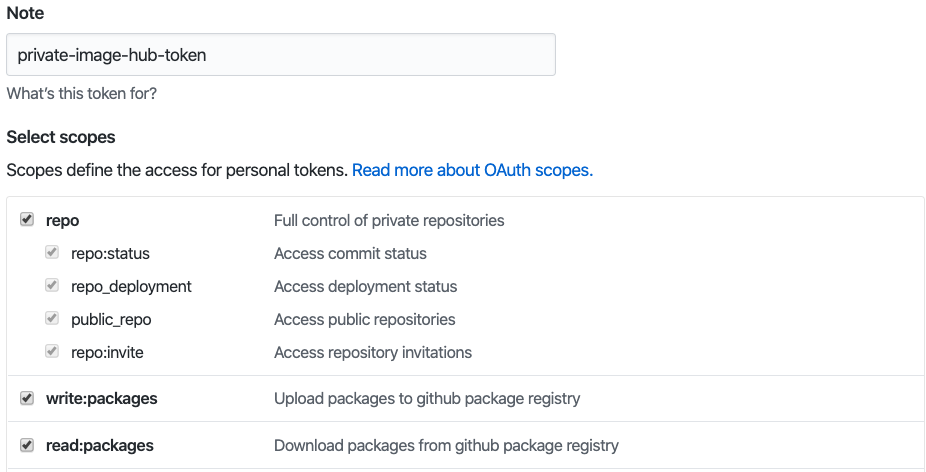
Configuring a personal access token
Go to developer settings in GitHub to generate an access token (Enable SSO in order to be able to access GitHub Equinor organization):

Set the privileges to allow it to create packages:
The workflow
In the above workflow we have a series of steps. They are:
Set default image tag- In the example we have a fixed tag for qa environment (i.e. master-latest) while we have a dynamic tag for prod environment. This step sets the default tag for qa environment, or any other environment we choose to add with a latest tagging strategyOverride image tag for prod environment- Gives a dynamic image tag for productionBuild API component- Building is now done outside of RadixPush the image to GPR- Pushes a package to Github package repository using thePRIVATE_TOKEN(personal access token)Prepare for committing new tag to radix config on master- Since we are using the dynamic tagging for prod environment, we have to commit to master a version of theradixconfig.yamlholding the newly produced tag. This step checks out master branch of the repositoryModify radixconfig tag for production on master branch- This step calls a custom script to modify the tag inradixconfig.yamland the commits and push the change on masterGet environment from branch- This steps calls a utility function in the CLI for obtaining the environment based on the current brach from the branch-environment mapping in theradixconfig.yamlof the repositoryDeploy API on Radix- This step calls the CLI function, which calls the deploy pipeline function of the Radix API for running the deploy pipeline. It uses the output of the previous step to tell Radix which environment it should deploy to. Note that is usingdevelopmentcontext to contact the API in the development cluster. Similarly if context isplaygroundit will contact API in playground cluster. If you remove this entirely, it will default toproductioncontext
Note that the push of the dynamic image tag of the prod environment to master branch creates a side-effect of building the QA environment again, as this is mapped to master. This shows, master branch should not be mapped to any environment (neither in the radixconfig.yaml, nor in the GitHub Actions workflow)
--from-config is an argument to radix-cli to tell it that there is an radixconfig in your repository that it can get information from, such as application name or branch mapping
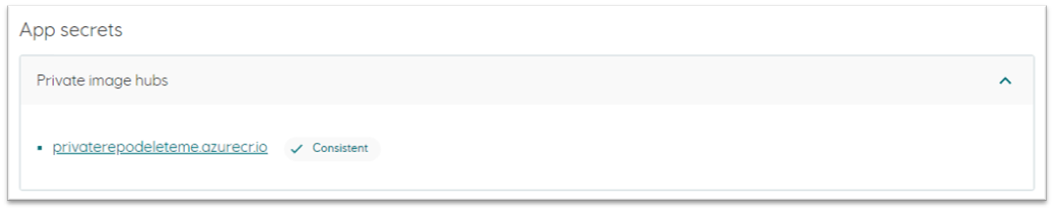
Configure Radix to use GitHub package
Go to the application Configuration page to set the secret, which will be the personal access token you have created with access to read packages in the Equinor organization. This gives Radix access to pull any package in the Equinor organization referred to in the radixconfig.yaml:
Coordinating workflow
In the example repository that we have used for this documentation we are setting secrets in Radix to be values associated with resources in Azure created for the application. The additional workflow steps are shown below. They are:
- Log into Azure - See here for documentation on what the
AZURE_CREDENTIALSshould contain Get instrumentation key and connection string- Obtains and passes on to subsequent steps the secret values to be set in Radix. Note that you shouldadd-maskto any secret that you pass on in the workflow, to ensure that it is not exposed in the log of the workflowSet instrumentation key as secret- Takes one of the secrets passed on from the previous steps and set the secret for the application, for the environment this branch is mapped to (in thedevelopmentcluster)Set connection string as secret- Sets the second secret value
Example of using GitHub action to create a Radix deploy pipeline job
Disclaimer: Please seek advice elsewhere on whether GitHub Actions and/or GitHub package repository is the right option for you. Both features are new, and we have too little experience as an organization to make any recommendations, both in terms of robustness and in terms of cost. A private Azure container registry (ACR) would for instance allow you to set it up with a service account, rather than using your personal account. This document is meant to be a user guide on how to combine these with Radix, as one of many alternatives for running CI outside of Radix.
Deploy only specific component
When a Radix application has multiple components and only one or some of them need to be deployed, an option component can be used to specify these components. Multiple components can be specified. Other components, if exist in the environment, will not be re-deployed, keeping their commitID and gitTags, environment variables, secrets, etc. Replicas of not deployed components will not be restarted on deployment.
Please look at Radix CLI deploy command for examples. The component option can also be used with Radix GitHub action and Radix API.
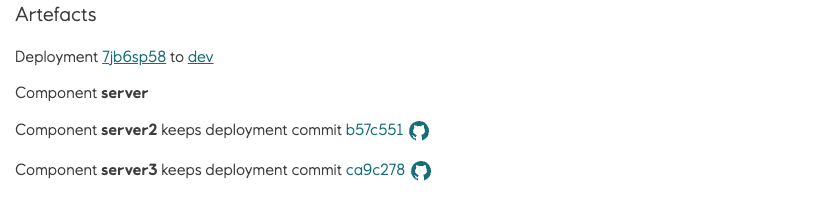
When deploy pipeline job has been run with component option, Radix console will indicate on pipeline job, deployment and environment pages which components were not deployed:
Component component1 keeps deployment commit @b57c551
Where commit @b57c551 will be shown only when the previous deployment of the component has this CommitID specified
Pipeline job
Deployment

Environment

Radix Github Actions
Example of an github action that triggers a deployment job
This examples requires a Azure User Assigned Managed Identity that has access to your application, and it must have a federated credentials mapped to your github repository and branch that will execute the workflow. Read more about Azure and Github Federated Credentials
name: Deploy on Radix # Authenticate with Federated Credentials

on:
  workflow_dispatch:
  push:
    tags:
      - 'v*.*.*'

permissions:
  contents: read
  id-token: write # required to get a GitHub federated credential

jobs:
  deploy:
    runs-on: ubuntu-latest
    steps:
    - uses: actions/checkout@v6
    - name: Set RELEASE_VERSION
      run: echo "RELEASE_VERSION=${GITHUB_REF#refs/*/}" >> $GITHUB_ENV

    - uses: equinor/radix-github-actions@v2
      with:
        azure_client_id: "00000000-0000-0000-0000-000000000000"
        # azure_client_secret: ${{ secrets.AZURE_CLIENT_SECRET }} # Available if you do not use Federated Credentials

    - run: rx create pipeline-job deploy
       --application application-name
       --environment qa
       --image-tag-name component=docker.io/bash:${{ env.RELEASE_VERSION }}
       --image-tag-name component2=docker.io/redis:${{ env.RELEASE_VERSION }}
       --follow
See Migrating from v1. to v2 here